
Look at this hologram that we made today!
We thought it turned out amazing and couldn’t wait to show you how we made it so that you can make one similar to it.
We know you want to make holograms that will WOW your friends beyond anything you have made thus far, so without further adieu, let’s get to it!
Step-by-Step Guide on How to Elevate Your Hologram Game with the 6×8 Upgrade Kit
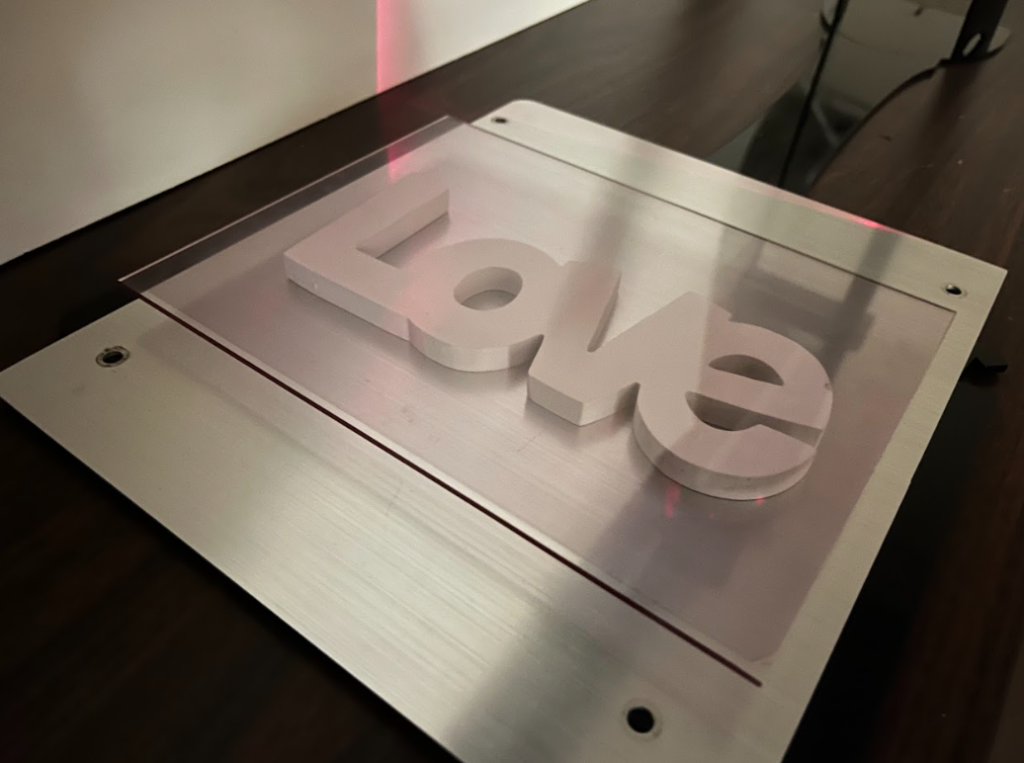
We created this “LOVE” hologram from our 6″x8″ Hologram Upgrade Kit. If you are passionate about making high quality holograms in your very own home, this is one of our best kits to level up your skills and let your imagination take you away.

This guide will mainly reference the 6″x8″ Upgrade Kit (together with components from your Hologram Kit), so if you’re eager to follow along (or simply curious), be sure to get one now!
*Please note that we have a limited production run of these kits going on right now and do not know when they will be back in stock*
- First things first, we assembled the starter kit and upgrade kit together according to both instruction guides to make what looks like a tower (looks pretty cool!)

- We then set our “LOVE” letters at the brightest point of the 20 mW Laser Diode and adjusted the laser and object as needed. We also used the White Card provided to see the brightest part of the laser easier. (By the way, you can find wooden script cutouts of the “Love” letters and many other phrases at a Michael’s arts and crafts store, or on Amazon. They were already painted white, which makes them reflect well under the laser light.)

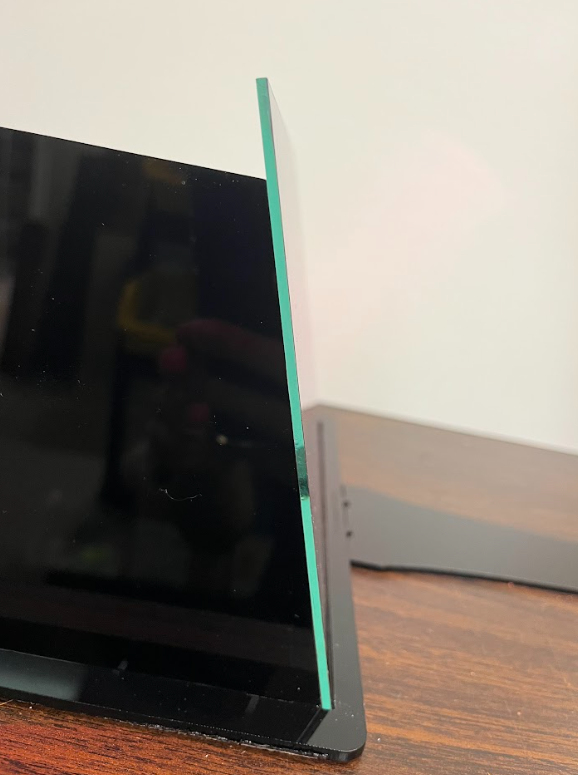
- After that, we put the shutter card on our laser, made sure the lights were off (or dimmed), and got out our Film Plate (the big 6″x8″ 😱). We placed the glass gently on the “Love” letters, let it settle into position to where it will not wiggle, and then removed the shutter.


- Here’s where the magic happens. Patiently wait with minimal noise and movement for about 8 minutes for the laser to do its work. I admit I personally just played a game of solitaire on my phone during this time…

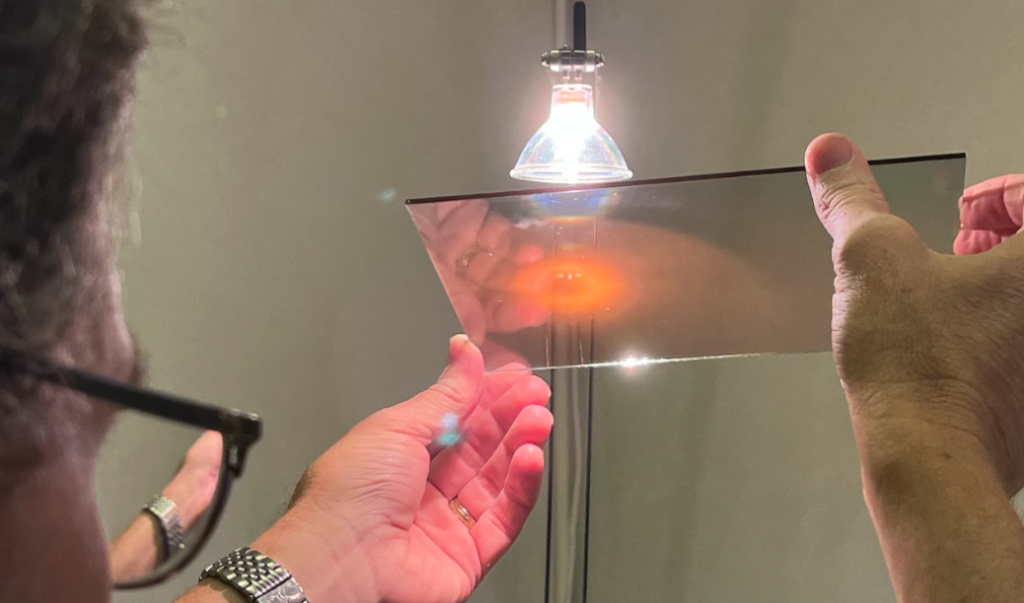
- Once time was up, we had a beautiful hologram that was an absolute masterpiece! You can see the hologram under the laser light, but because it is a Reflection Hologram, it’s viewable under white light too (spot light, sunlight, or even a smartphone flashlight)! Be sure to see our previous blog post on Reflection Holograms – Viewing holograms in sunlight or with a smartphone.

Common Mistakes that Could Mess Up Your Holograms! 😭
If you have ever tried to make holograms on your own, you have certainly experienced this feeling:
You eagerly build your hologram set up, follow all of the Youtube directions PERFECTLY, wait patiently for the film to expose, then slosh some chemicals around (did we mention that LitiHolo film is self-developing?) to hopefully develop into a beautiful hologram!… only to get a dim or even BLANK result. 🙁
“How could it possibly be?? What did I do wrong? Are the hologram Gods angry with me?!”
We understand. Making holograms without something like a LitiHolo Hologram Kit can be extremely frustrating (and you can spend $1,000’s).
Holograms are something unbelievable and a little bit of science magic! Making holograms in your own home, not in a laboratory, is something incredible that must be experienced for yourself!
LitiHolo’s kits are designed to maximize your chances of getting a beautiful homemade hologram, and to ensure that your hologram journey is marked by triumph and excitement, not frustration.
Even with our cutting edge technology at your fingertips, the path to the perfect hologram is still sprinkled with challenges, so here are some golden nuggets of wisdom to perfect your holographic dreams!
- Steady your table and setup – no wobbling allowed!
- Let the film plate settle for about one minute before you take off the shutter and expose it.
- Ensure the film plate is fully leaning on the plastic Plate Support.
- After your exposure is finished, you can do a final “cure” by exposing the film to a bright spot light or other bright light.
- Check to see if your object(s) is close enough to the Film Plate. This is why we really like this method of laying the plate flat ON TOP of your object(s), keeping the objects right behind the film plate.
- For some added background effect, try using a brushed or textured metal behind the object, which will give it some great pop and a cool laser flare in the background.
Often, issues come from just subtle shifts in the setup during exposure that can hurt your result. It is even said that a hologram of a living plant would be too much movement because the plant would grow too much during exposure! Those are tiny movements that can affect your hologram.
Obviously, since movement cannot always be perfected, sometimes a second try is all your hologram needs with some of the extra tips above.
Hologram Project Ideas for Your Next Exciting Weekend!
If you are reading this, congratulations, you have distinguished yourself apart from all of the casual hologram novices! YOU want to bring your hologram game to the NEXT LEVEL.
As a gift for reading this far, here is a list of project ideas for your next hologram adventure:
- Arts & Crafts: Some of the best ideas can be found in a local or online arts & crafts store like Michael’s. Just walk around and you’re sure to find some inspiration. Small decorative items often work great!
- Kids’ Toys: Some of your kids’ old toys can often make some of the coolest holograms! Perhaps a superhero, Hotwheels, or mini stuffed animal. Maybe a tiny teacup set you used to play with your daughter(s)?
- Jewelry: Interesting jewelry you have like necklaces, special lockets, or antique watches can make some great holograms. Maybe an engagement ring and a hologram proposal!
- Collector’s Items: If you are a collector, perhaps feature your collection in a hologram! Geodes, crystals, special coins and other collector’s items work well.
- Christmas Ornaments: Christmas ornaments are often exciting and small enough for a hologram. Pick out a couple from your storage so they can see the light of day more than once a year.
- Holiday Decorations: While we’ve got Christmas on our mind, maybe there are other holiday decorations you want to break out of your attic. Go explore! Maybe some Halloween holograms!
- Beach Shells: Gone to the beach and don’t know what to do with all those pretty shells you collected? Make a hologram!
- Pins & Buttons: Do you have a bunch of unused decorative pins or buttons laying around somewhere? Try some in a hologram!
- Gift: Is there someone you have in mind that would love a hologram gift? Someone with a birthday coming up? Maybe buy some crafty letters to spell out their name. Or think about what they enjoy and make a hologram of it!
Soon you can be making a hologram similar to the “LOVE” hologram we made earlier today to show off to all your friends!

If you have any more ideas for creative holograms, drop them in the comments section below for the rest of the Hologram Community!
And if at this point you are watering at the mouth for a relaxing weekend of making holograms with a refreshing drink in your hand, our limited production run of Hologram Kits, Hologram Upgrade Kits, and Full-Color Hologram Kits is going on RIGHT NOW, so don’t wait!
And as always, if you have any questions about anything hologram related or about any of our products, feel free to shoot a message to info@1abeee9791.nxcli.io and we will get back to you shortly! We’d love to hear from you!
– LitiHolo
Some of the most incredible holograms I’ve seen, were made of very detailed objects. Open pocket watches work very well (of course, not running).
A mounted butterfly is another great object, especially in color. Though, because its wings can move a bit in air, I imagine it is important to let the air settle first after you disturb the air with your movement and even your body heat.
Hi, my first hologram dates 1980 and it was done with Agfa plates and very toxic bleaches. The self-developing plates by Lithiholo revived my dream of making holograms. I bought plates and the kit for transmission and reflection and at the end I went back to my initial setup for reflections, based on a container with sand and a support to keep the plate suspended over the objects.
When I was doing it in the ’80 I found that thermal expansion is an issue with long exposures and therefore I never let the objects touch the plate. Sand is also perfect for dampening vibrations.
My suggestions are therefore to let the plate and the object stay in the darkness in the same environment for at least 15 minutes to get everything at room temperature, then try to create a setup in a sandbox with lateral supports that are as wide as the plate and touch it just there. The last suggestion is to use objects that are matte (seashells, matte metals, circuit boards…).
With this setup I started straight away and my rate of failure was just 2 out of 20 shots.
I am now experimenting with RGB lasers diodes to make full color, but I have to manage the different sensitivities of the plate according to wavelength.
I will gladly share the pics of my results.
Simone
Simone again…
I forgot to mention that because I do reflection holograms, my last step is to use black acrylic spray paint to paint black the back of the plate. In this way they become much easier to see in any condition.
Obviously, you don’t do that if your composition is mixed with real objects placed in the back of the plate and they need to be seen.
Simone